Create processes
6.1 Trigger a credit card payment manually in the card terminal
6.2 Execute direct debits in the direct debit terminal
6. Create processes
To create transactions, you need access to the MOTO terminal, which you must contract. This chapter describes the possibilities of the Merchant Cockpit, how you can enter payments yourself, for example for telephone and fax orders. A distinction must be made between payments by card as well as direct debit payments.
Transactions can be created in the application in four ways
– Trigger credit card payments manually in the card terminal
– Execute direct debit payments in the direct debit terminal
– Create transactions with “Pay by Link” (Paymentlink)
– Create transactions with batch files
The Card Terminal tab allows you to initiate credit card payments using credit card data provided by the customer. The credit card data can be transmitted, for example, by telephone or in writing (by letter or fax – in no case by mail) (MoTo stands for MailOrder / TelephoneOrder). Please pay attention to your PCI DSS certification and clarify in advance which options are available to you. 3-D Secure authentication is not possible in this context, since the customer (cardholder) does not make the payment himself.
The Register Direct-Debit terminal offers you the option of initiating direct debits. Direct debits are transmitted to the customer’s bank. Here, the payee (merchant) instructs his bank to debit an amount from the account of the payer (end customer).
The Pay by Link tab allows you to send your customers a payment link to the Hosted Payment Page payment form. The payment link is sent by e-mail. On the Hosted Payment Page your customer has the possibility to choose a payment method and to enter his payment data. The big advantage here is that your customer can choose the preferred payment method himself and, if necessary, authentication is also possible for credit card payments.
The Batch Files tab allows you to create several transactions at once. You can combine transaction data in a batch file and transfer it to Computop Paygate. After successful transmission Computop Paygate executes the processes.
 Create subscriptions
We only create subscriptions via the OPS-interface.
6.1. Trigger a credit card payment manually in the card terminal
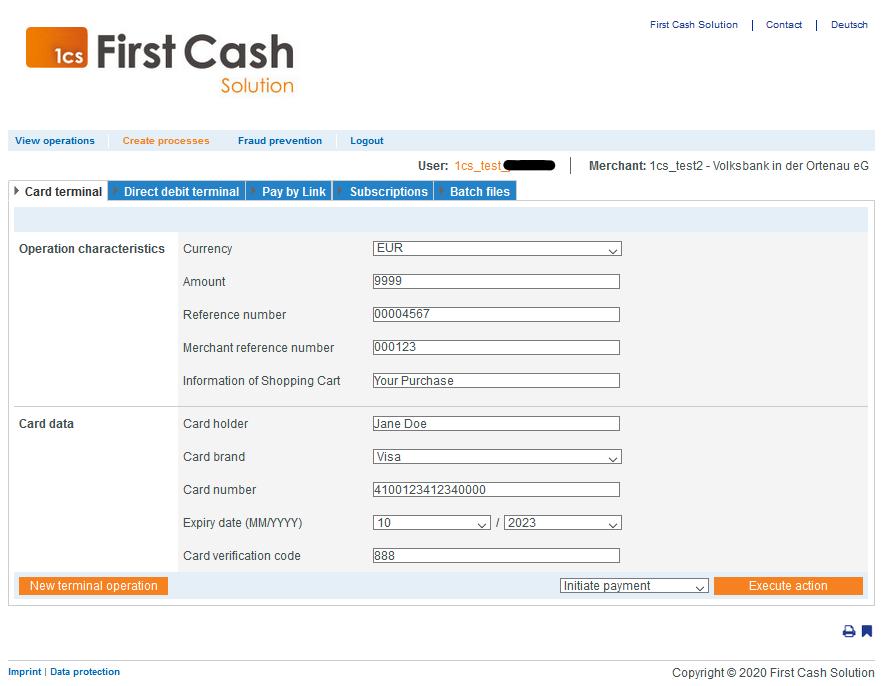
You can create a transaction (credit card payment) using the “Create transactions” → “Card terminal” tab. Here you have the option of initializing a credit note or a payment for the credit card entered. You can only create one transaction at a time in this way. If you want to create several processes, you can use a batch file for this.
New Terminal Operation Button
The “New terminal operation” button removes any entries you have made or data you have entered.
In the following dialog, enter first the transaction characteristics and then the card data in separate areas.
Filling in the “Transaction characteristics” input field:
Transaction characteristics describe the type and payment method of a transaction. You can enter the following transaction characteristics: Currency, Amount, Transaction Type, Reference Number, Merchant Transaction Number, and your shopping cart information.
For the transaction characteristics, select the currency using the Currency combo box. Then enter the amount in the usual notation with any digits after the separator.
Entering reference number and merchant transaction number:
The reference number and merchant transaction number are used to uniquely identify the transaction in the application. The merchant reference number serves as the disbursement reference, which is specified in the corresponding EPA file of your bank.
Reference number
Please note that without entering your own reference number (disbursement reference), no transactions can be assigned and created.
The merchant transaction number is automatically created by the application for each transaction. The merchant transaction number allows you to uniquely identify each transaction. You only need to enter the merchant transaction number if you want to add a credit or a payment to an existing transaction.
Filling in the “Card data” input field:
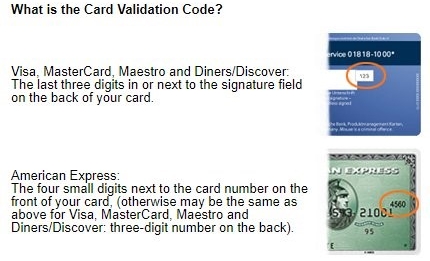
In the card data area, enter the name from the cardholder and select the card brand in the combo box. Below that, enter the full card number and for the expiration date select the month and year of card validity with the two combo boxes. In the Card Validation Number field, you can enter CVC (Card Validation Code) or CVV (Card Validation Value): This is an additional numeric code that can be found on the credit card. The exact position depends on the card brand and can be seen in the following figure.
Notes:
- Please make sure to always enter all digits of the credit card number without spaces
- All payments made in this way also appear on your transaction list in the Merchant Cockpit
- no transactions can be assigned without entering your own reference number (payment reference)
- Your shopping cart information input field must be filled according to the rules of the payment type and payment type provider used to create the transaction. The corresponding parameters in the payment types are OrderDesc and OrderDesc2.
Finally, at the very bottom of the Select action combo box, set the Initiate payment task and then click the Execute action button. After a short time the result of the payment process will be displayed.
Create credit card payment or credit note
To create a transaction (credit card payment or credit note), first enter the transaction characteristics and card data. Then click Select action and decide on an action.
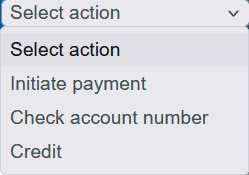
| Action | Description |
|---|---|
| Initiate payment | Deduct amount from card data |
| Check card number | The system checks whether the card really exists. A so-called Account Verify is performed, whereby a 0-amount authorization is carried out. |
| Credit | Credit amount to the card data |
6.2. Execute direct debits in the direct debit terminal
You can use the “Create transactions” → “Direct debit terminal” tab to create a transaction (direct debit). The direct debit is then transmitted to your bank, which initiates a direct debit from the end customer’s account. If you create a transaction via the Direct Debit Terminal, the direct debit is sent to the end customer’s bank and his account is debited. You can only create one payment transaction at a time this way. If you want to create several transactions, you can use a batch file for this.
In the following dialog, you first enter the transaction characteristics and then the account data in separate areas. The rest of the procedure is largely the same as described in Chapter 6.1 on card payments.
For the transaction characteristics, select the currency using the Currency combo box. Then enter the amount in the usual notation with possible digits after the separator. You can also enter a reference number, a merchant transaction number and shopping cart information.
Fill in the “Account data” input fields:
You can enter the following account data:
- Account holder
- IBAN
- BIC
- Bank
- Mandate reference
- Date of mandate
- Mandate type, subsequent mandate type
- Debit delay
- Credit note delay
The input fields Account holder, IBAN, BIC, Bank, Mandate reference and Mandate type are required for creating a transaction.
For Account holder, IBAN, BIC and Bank you must enter the account details of the account holder from which the money is to be debited.
Enter mandate reference
Here you can enter your mandate reference, which will be used to execute the direct debit.
The mandate date is the date on which the customer approved the direct debit mandate. If you click in the input field of the date of mandate issuance, a calendar will open where you can select a date.
The mandate type and the follow-up mandate type are required parameters of the SEPA scheme. The parameters must be selected correctly for the process to be created. An explanation of the individual mandate types can be found in the following table “Mandate type”.
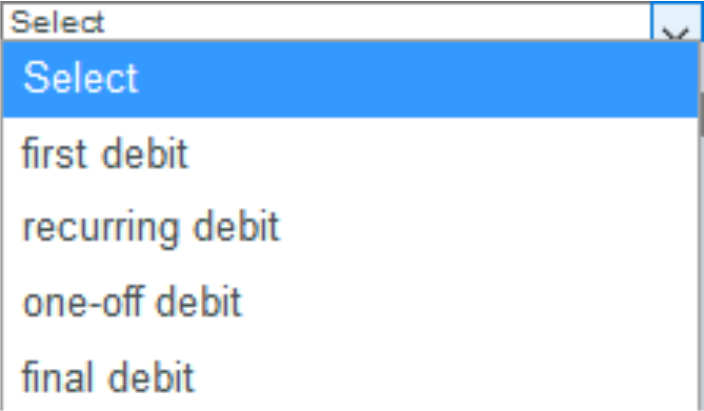
| Mandate type | Description |
|---|---|
| Initial debit note | First direct debit of a sequence of direct debits |
| Direct debit | Repeat debit of a sequence of direct debits |
| One-time direct debit | One time debit |
| Last debit note | Last direct debit of a sequence of direct debits |
Enter debit delay and credit delay.
Here you can specify the time after which the payment or the credit note should be executed – the reference time is now. The delay is specified in hours (between 1 and 696 hours) until execution – where, for example, 120 hours = 5 days from now.
Finally, at the very bottom of the Select action combo box, set the Initiate payment task and then click the Execute action button. After a short time, the result of the payment process will be displayed.

Note:
• no transactions can be assigned without entering your own reference number (payment reference)
• the input field Your shopping cart information must be filled according to the rules of the payment type and the payment type provider with which the transaction is created. The corresponding parameters in the payment types are OrderDesc and OrderDesc2.
6.3. Creating transactions with “Pay by Link” (Paymentlink)
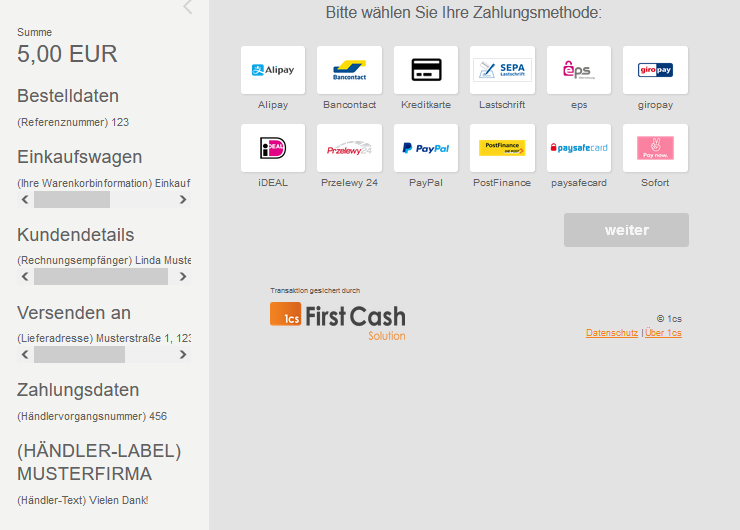
With “Create transactions” → “Pay by Link” you can create a transaction (payment by link). When you create a transaction via the “Pay by Link” terminal, a payment link with the payment request is sent to the specified buyer via e-mail. This link will redirect the buyer to the Hosted Payment Page payment form. The customer can make the payment independently with the help of this link.
Pay By Link
Instead of triggering a payment directly as in the terminal, with Pay By Link the payment is sent to the customer by e-mail as a link leading to the payment form. The customer opens this link and completes the payment independently, e.g. by entering their credit card data. The available payment methods, which are displayed to the customer, depend on the payment methods configured by us for you.
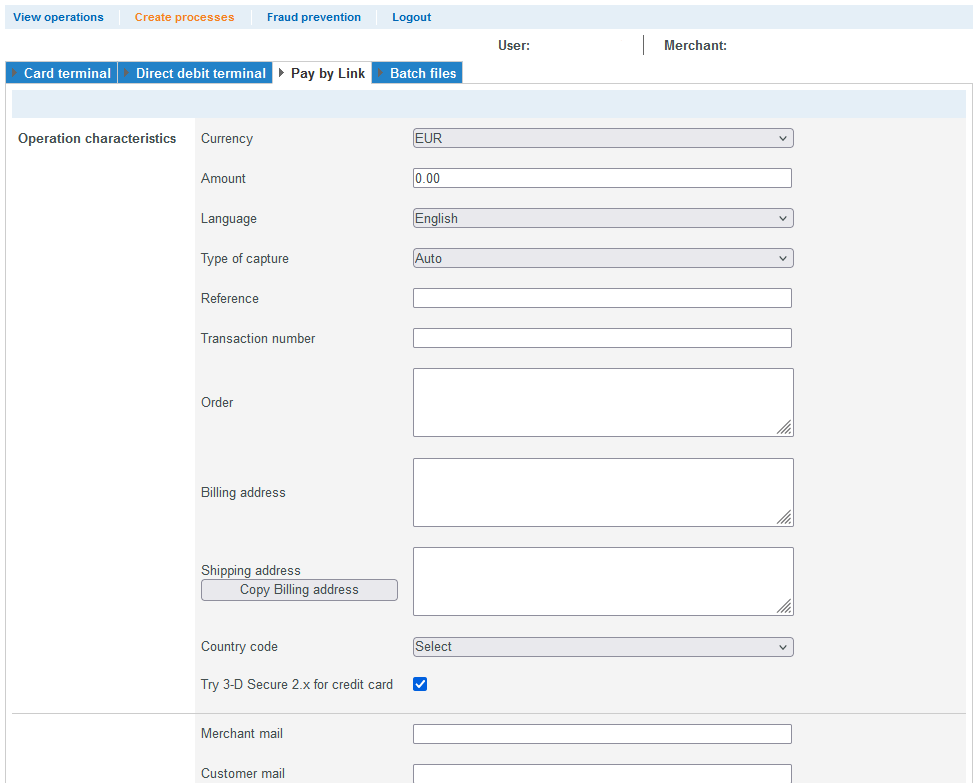
Select currency and amount
When you open the “Currencies” combo box, you will see all possible selectable currencies. In the “Amount” input field you can enter the desired payment amount.
Select language
When you open the “Language” combo box, you will see all possible selectable languages for displaying the Hosted Payment Page to the customer.
The booking type indicates when the transaction is booked after the amount is authorized by the bank.
For the Manual booking type, contact support@1cs.de to learn more about the options.

| Action | Description |
|---|---|
| Manual | After authorization by the bank, the amount must be posted manually by the merchant |
| Auto | After authorization by the bank, the amount is posted directly |
Enter reference number and transaction number
The reference number and transaction number are used to uniquely identify the transaction in the application.
The merchant reference number serves as the disbursement reference, which is specified in the corresponding EPA file of your bank.
Reference number: Please note that without entering your own reference number (disbursement reference), no transactions can be assigned and created.
Enter your order details
Here you can enter the goods or services that your customer has ordered from you.
![]()
Input field “Order”: The “order” input field must be filled in according to the rules of the payment type and payment type provider used to create the transaction. The corresponding parameters in the payment types are “OrderDesc” and “OrderDesc2”.
Enter Billing address / Shipping address
Billing address/Shipping address must be entered as follows:
First name, last name
Street, Streetnumber
Postal Code, City
3D-Secure Checkbox
This checkbox must always be selected.![]()
Fill in input fields of the email:
The example shows a completed email from the merchant and how the customer receives email.
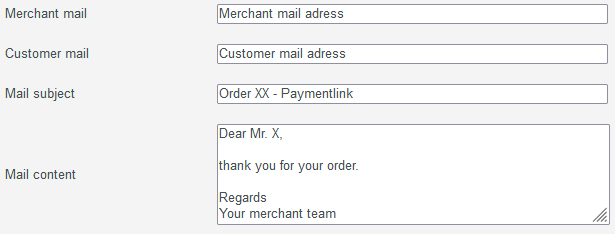
Example e-mail
From: Dealer email address
Sent: Thursday, 26 March 2020 07:13
To: Customer email address
Subject: Order XX – payment link
Initiate payment (The customer will receive a link of this type and must open it).
Dear Mr. X,
thank you for your order.
Regards
Your merchant Team
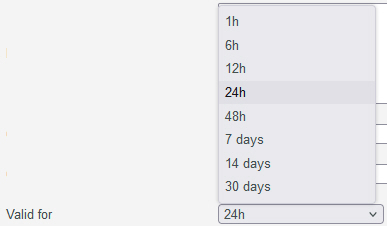
Select validity of the link
Here you can set the validity period for the pay link using a drop-down menu. After the selected time, the pay link will expire.
Pay by Link – Create payment
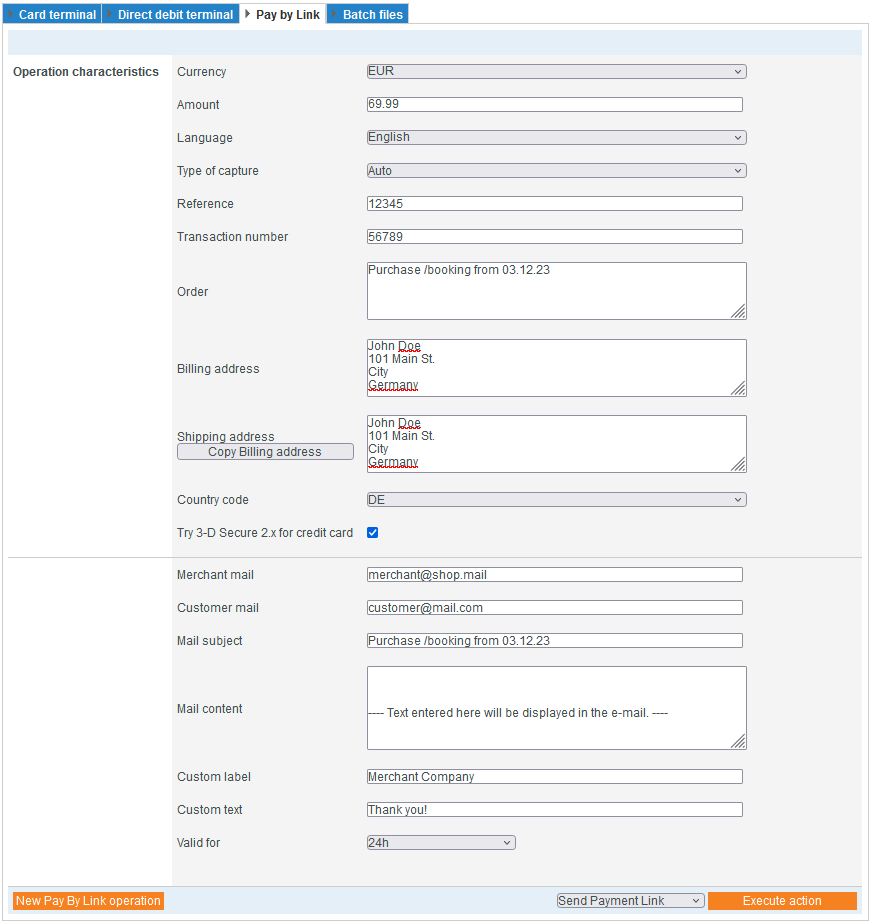
First fill in the transaction characteristics and the input field for the e-mail and select the action in the “Select action” combo box.
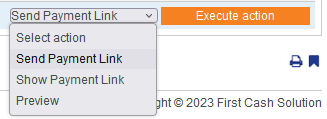
| Action | Description |
|---|---|
| Send paymentlink | Email with paymentlink is sent to the customer |
| Show paymentlink | The payment link as the customer receives it is displayed under the “Perform Action” button. You can use the “Copy Payment Link” button to copy the payment link and embed it in a self-designed email to the buyer. |
Click the “Perform Action” button.
Process of a “Pay by Link” payment from the customer’s point of view
The customer will go through these steps when he received the email:
1. the customer clicks on the payment link in the received email.
→ The customer is taken to the payment method selection of the Hosted Payment Page. 2.
2. the customer selects the payment method and clicks the “Continue” button.
The customer enters his payment data and goes through the payment process for the payment method.
→ Finally, the customer receives a success or error message. If the error message appears, the customer can execute the link again and repeat the entries
6.4 Creating operations with batch files
The Batch Manager allows you to transfer payment transactions in the form of files. Using the “Create Transactions” → “Batch Files” tab, you can create multiple transactions using a batch file. To create transactions, collect transaction data such as credit card number, amount, and currency in a batch file that you can transfer in the 1cs online payment system. When you upload a batch file in the application, the 1cs online payment system, executes the transactions stored in the batch file. After processing, you can export the processing status information of the batch file. You can export the search results as an Excel spreadsheet.
The Batch Manager can help you compile and use batch files. Using the Batch Manager is an optional feature that must be ordered separately.
Batch files
A detailed explanation of the structure and use of batch files can be found in the programming manual in the Batch manager chapter at the end of each payment type in the payment type documentation.
Some payment types require specific parameters that must be transferred in the batch file.
The specific parameters of the payment type for the batch file are described in each case at the end of a payment type chapter under the heading “Batch use of the interface”.
After processing, you can search for the batch file with the information about the status of the created operations and export it as a batch file. This gives you the possibility to analyze errors when creating operations using a batch file.
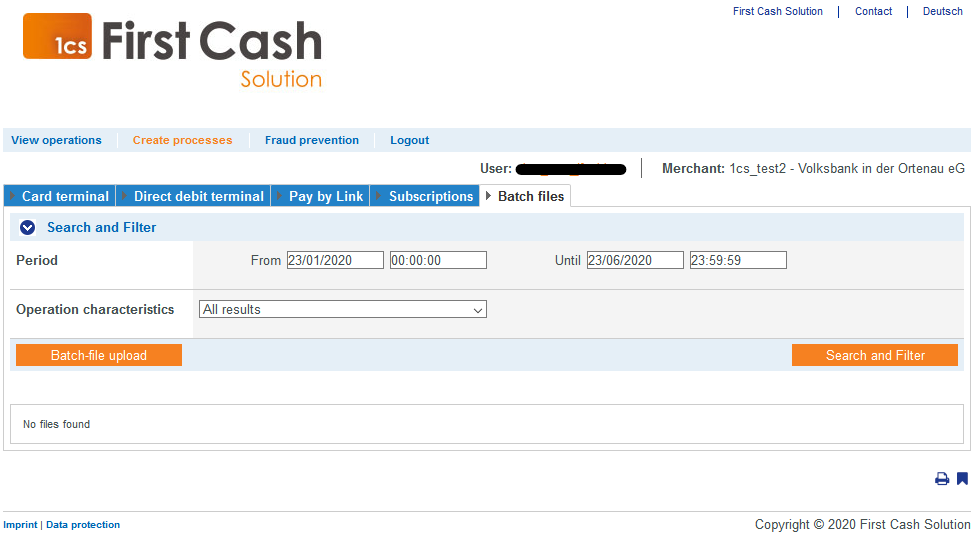
With the shown search and filter area you can query which batch files are processed in the system.
Set selection area “Period” with the combo boxes from and to.
Select the “Process characteristics” selection area:
Operation characteristics describe whether an operation has already been processed or not. In the combo box Transaction Characteristics, you can search for all batch files using the setting All statuses or you can select the setting Process file to determine only all files that have already been posted or, on the other hand, search for the files that are still open using File for processing. By clicking on the Search & Find button you execute the search.
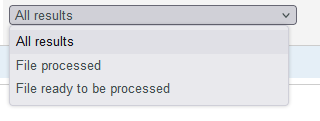
| Status | Description |
|---|---|
| File processed | Batch file already processed |
| Show paymentlink | Paymentlink Batch file not yet processed |
Upload batch file
To upload a batch file click on the “Upload Batch File” button.
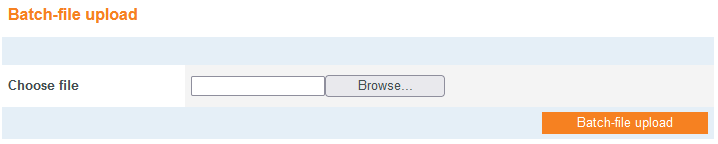
In the following dialog, click Browse and navigate to the desired batch file on your PC. Finally, click the Upload Batch File button to transfer the file to the 1cs Online Payment System for processing.
Exporting the status of a processed batch file
When you upload a batch file in the application, the uploaded batch file will store the status of the processing of the operations. You can export the batch file with the processing status information. In the batch files, you can see if all the operations were created correctly or if any errors occurred.
To export the batch file, select the desired values in the selection areas and click the Search & Filter button. All matching batch files will be listed in the File Name column. Click on the desired file name to download the batch file as a DAT file.