Administration and user management
3. Administration and user management
You define basic settings for the users of your access to the Merchant Cockpit in the Administration area of the main menu. In addition to setting up users and assigning the respective authorizations, you can also track in detail here which security-relevant processes have been logged for your user account.

Note: If a user enters his password incorrectly several times, the 1cs online payment system will block the access. The user will receive a corresponding notice on the login page. He should now contact the support via the contact form. If a user administration with own administrator is set up for the merchant, this administrator will now be informed by e-mail. To reset the password, contact 1cs at 07805-91696-0 or service@1cs.de.
3.1. Change password
You will receive a password from First Cash Solution to access your transaction data. For security reasons, you must change this password after the first login. Later, you should change this password again every 4-6 weeks.
To do this, click on the link of your user name next to Users and scroll all the way down in the users detail view. There, click the New Password button.

An additional dialog section will appear where you must first enter your Current Password. Below that, enter a New Password. To avoid typing errors, please repeat the password entry a second time. Then confirm the change.
Note: Please note that for security reasons a password must be at least 8 digits long, contain one digit, one special character and be case sensitive. Furthermore, the new password must not be one of the last 4 passwords again.
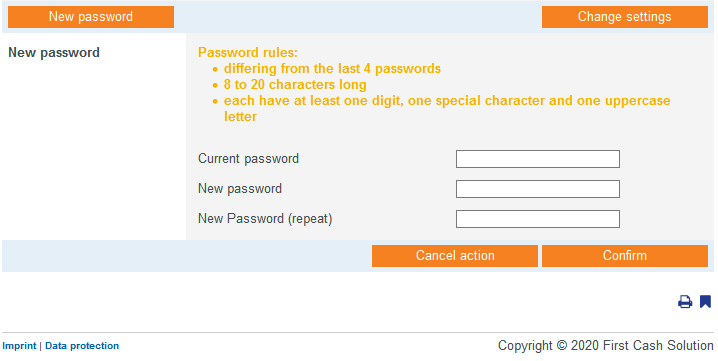
 Rules for choosing a password
A valid new password must meet the following criteria:
- 8 to 20 characters long
- at least one digit, one special character and one capital letter each
- different from the last four passwords
3.2. Change language
Languages German/English
At the top right in the Merchant cockpit you have the option to switch between the languages German and English. If you need another language, follow the instructions in this chapter.
To customize the language, you need to access the merchant and user data by clicking on the desired user.
Then you can reach the language customization area by clicking on “Change settings” at the bottom right of the interface. In the Culture input field, you can now set and confirm the appropriate language.
Show selected language
To activate the newly selected language, you must log out of Computop Analytics and log in again. Only after logging in again will the new language be displayed in Computop Analytics.
Currently the following languages are supported:
- Danish
- German
- English
- Spanish
- French
- Italian
- Polish
- Swedish
- Simplified Chinese
Another selected language (“Culture”) is automatically displayed in English.
3.3. User and access management
Note: If you want to use the user administration, order it as an additional option. Then contact First Cash Solution Support, who will give you the necessary administrator rights.
If several users use your transaction list, you can use the Merchant Cockpit user management to assign individual passwords and access rights to the users in order to prevent incorrect operation, sabotage and data misuse and to ensure the traceability of transactions.
As a rule, several users access the data in the Merchant Cockpit: accounting checks incoming payments, a call center enters payments for telephone orders, and support makes credit entries if a customer complains about goods.
For security reasons, not every user should be able to access all components of the Merchant Cockpit. Therefore, the user administration gives you the possibility to assign each user only the access rights he needs to perform his tasks. Furthermore, each user receives his or her own access data so that you can track which employee has executed a booking or credit memo.
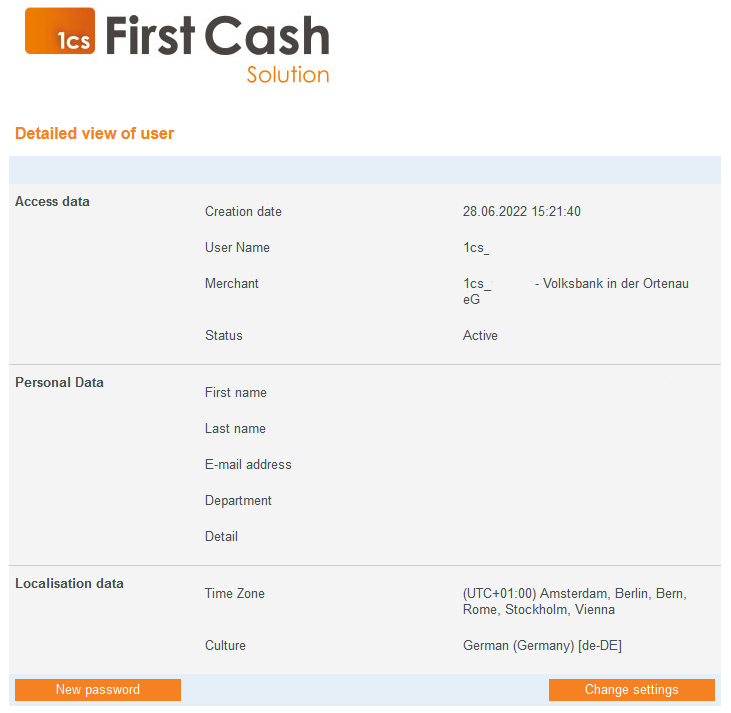
The user administration can be found in the administration main menu in the user administration tab. A list displays all configured users page by page. The user administration offers you an overview of all created users of your application. You can reassign the password for each user, change the personal data and de- or activate the page rights.
3.3.1 Create a new user
In the Administration → User Management tab, you can create a new user for your application using the New User button. You can grant access to the application to several people by creating new users. This has the advantage that you can distribute task areas and view activities of each user in the application.
The Users detail viewappears. With settings for access data, personal data and localization data, as well as the assigned page rights.
The Access data area informs about user name and merchant as well as the time of creation. In the Status combo box, you can make a user active or inactive.
In the personal data you enter first name, last name and, if necessary, department and detail. In addition, you store the e-mail address here, which will later be used automatically for inquiries via the contact form.
In the localization data, you select the desired time zone via a combo box. The display of date and time information in the Merchant Cockpit is adapted to the time zone set here. What sounds trivial, you should nevertheless pay close attention to. For example, if you compare the transaction data of a certain day from New York and Berlin, different time periods are considered for this. Therefore, first consider on the basis of which local time the data is to be evaluated. To do this, you can also temporarily change the appropriate time zone in the profile.
In the culture combo box, select your combination of language and country, for example German (Germany) [de-DE]. This language setting controls the future view of the Merchant Cockpit, see General Basic Functions of the Web Interface on page 6. The languages currently supported are German, English, Spanish, French, Italian, Polish, Danish, Swedish and Chinese.
Showing and hiding page rights
If you select a parent page right (marked in bold), the corresponding child page rights are displayed. In the figure Page rights all subordinate page rights are shown.
It is possible that not all of the following page rights are available to you. This depends on what is part of your contract.
The rights are divided into the groups:
- View operations
- Change operations
- Terminal
- Batch files
- Fraud prevention
- Administration
- Delete personal data
The respective detailed settings are largely self-explanatory and can only be configured after you have activated the relevant group. Depending on the function of the respective employee, you should only assign the rights that are actually required for his/her tasks.
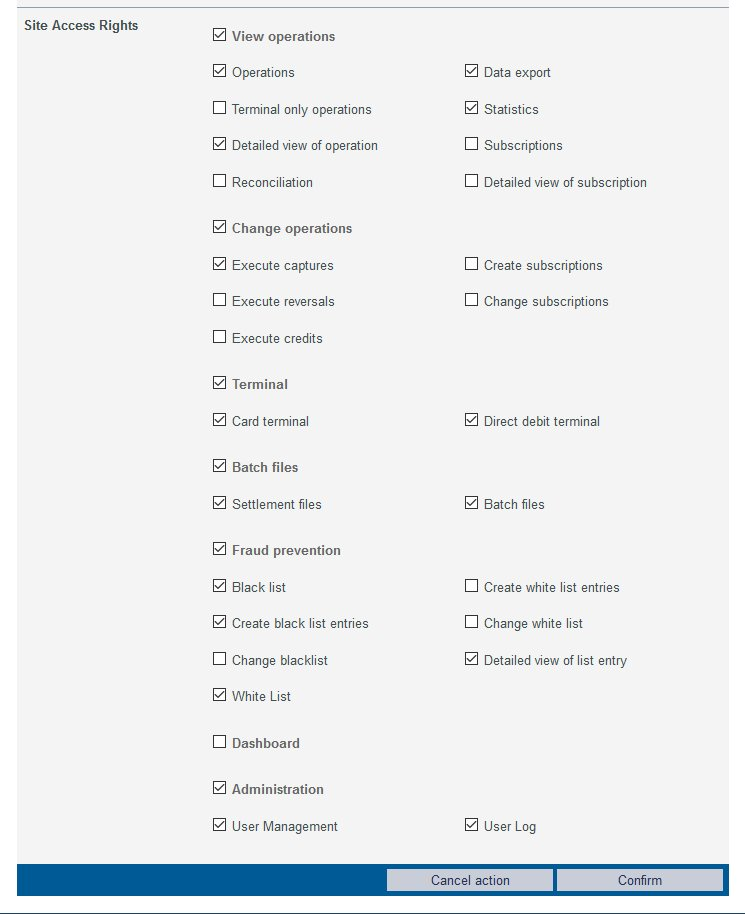
Table page rights “View processes”
All rights in the view transactions area cannot execute transactions. Viewing transactions is important for accounting purposes, for example. Here you only control the visibility of the data individually with the following options:
- Transactions: view only for the list of transactions without details
- Terminal transactions only: View only for manually entered transactions
- Transaction detail view: access to the details of transactions
- Cash cut: Queries in the cash cut tab
- Data export: Export of data queries to CSV files
- Statistics: Access to overall statistical analysis and reporter functions
| Page Rights “View processes” | Description |
|---|---|
| View processes | Unlocking the “View processes” tab |
| Data export | Unlocking the “View processes → Data export” tab |
| Terminal operations only | The user will only see tasks in the application that were created using the “Create tasks” tab (optional). |
| Statistics | Unlocking the “View processes → Statistics” tab |
| Detail view operation | Unlock the detailed view of transactions. In the detail view you get information about customer and transaction data and you can perform additional actions. |
| Cash cut | Unlocking the “View processes → Cash cut” tab |
Table page rights “Change processes”
With rights from the second area Change transactions, payments can be executed. Here you only give the rights to those employees who need them. If, for example, you only allow credit notes to be issued by support after they have been checked, you should also assign the right for this accordingly. In detail, you assign the rights for:
- Execute postings: Post authorized payments somewhat after goods have been shipped
- Execute cancellations: Cancel payments for items that are no longer available for delivery
- Execute credits: Refund amounts for returns or complaints
- Create subscriptions: Set up subscription payments, such as for installment purchases
- Change subscriptions: Adjust existing subscription payments
- Perform manual authorization: Reauthorize remaining amounts after timeout
- Delete personal data: Delete personal data of the customer from the transaction
| Page right “Change processes” | Description |
|---|---|
| Change processes | Unlock the editing of tasks via the detailed view of tasks |
| Execute posting | Enable the action “Execute bookings” in the detailed view of transactions |
| Execute credit notes | Enable the action “Execute cancellations” in the detailed view of operations |
| Execute credit notes | Enable the action “Execute credit note” in the detailed view of transactions |
| Delete personal data | Enable the action “Delete personal data” in the detailed view of processes |
Table page rights “Terminal”
The third area Terminal regulates the manual input of transactions. You assign the rights separately for:
- Card terminal: manual entry of credit card payments
- Direct debit terminal: Manual entry of direct debit payments
| Page Right “Terminal” | Description |
|---|---|
| Terminal | Unlock the “Create operations” tab |
| Card terminal | Unlock the “Create processes → Card terminal” tab |
| Direct-Debit-Terminal | Unlock the “Create processes → Direct debit terminal” tab |
Table page rights “Batch-Files”
The next section, Batch Files, controls file transfer permissions to and from the 1cs Online Payment System with the following options:
- Settlement files: Download provided files for settlement and reconciliation.
- Batch files: upload for automated processing of transactions
| Page right “Batch files” | Description |
|---|---|
| Batch files | Enable the uploading and downloading of “batch files” |
| Accounting files | Unlock the “View processes → Accounting files” tab |
| Batch files | Unlock the “Create processes → Batch files” tab |
Table page rights “Fraud prevention”
Settings in the Fraud prevention section are security relevant and do not need to be changed for most tasks. Permitted actions can be specified in great detail with the following options:
- Create positive list entries: Add BIN entries to the global positive list
- Negative list SecurePay: view and change temporary block list of SecurePay
- Positive list SecurePay: view exceptions for checks by SecurePay
- Detailed view SecurePay: view blocking and exception entries in the detailed view
- Change positive list: Add or remove entries from the positive list
- Positive list: View the contents of the global positive list
- Negative list: View the contents of the blacklist
- Create negative list entries: Block individual cards, accounts or IP addresses
- Change negative list: Add or remove blocking entries from the negative list
- Detailed view of list entry: View details of individual blocking or exception entries
| Page right “Fraud prevention” | Description |
|---|---|
| Fraud prevention | Unlock the “Fraud prevention” tab |
| Negativ list | Unlock the “Fraud prevention → Negative list” tab |
| Positive list SecurePay | Unlock the “Fraud prevention → Positive list SecurePay” tab |
| Negativ list SecurePay | Unlock the “Fraud prevention → Negative list SecurePay” tab |
| Create positive list entries | Enable the creation of entries in the positive list |
| Create negative list entries | Enable the creation of entries in the negative list |
| Change positive list | Enable changing entries in the positive list |
| Change negative list | Enable changing entries in the negative list |
| List entry detail view | Unlock the opening of the detailed view of a list entry in the negative and positive list |
| Positive list | Unlock the “Fraud prevention → Positive list” tab |
| Detail view SecurePay | Unlock the opening of the detailed view of a list order in the negative and positive list SecurePay |
Table page rights “Administration”
Finally, administration should be reserved for only one administrator in the company. Access can be enabled separately for
User administration: Change access rights of all users
Activity log: View log of user activities without being able to change rights.
For example, an employee can be given access to the log data without being able to change other rights.
| Page right “Administration” | Description |
|---|---|
| Administration | Unlock the “Administration” (optional) tab |
| User management | Unlock the “Administration → User management” tab |
| Activity log | Unlock the “Administration → Activity log” tab |
Using the icon with the abbreviation .csv at the bottom right of the Merchant Cockpit user management dialog (see figure above), you have the option of downloading the list of users shown in CSV format, for example to open it in Excel
3.3.2 Manage created users
With the tab “Administration → User administration” you can view all users of the application and change their user data. You have the possibility to call up further information (detail view) for each user. In the detailed view you can change the personal data, the language and the page rights.
To call up the detailed view of an operation, click on the name of the desired user in the User name column.
Detail view of the user is divided into the areas Access data, Personal data, Localization data and Page rights.
Change personal data
You can change the personal data with the Change settings button.
How to change the personal data can be found in the chapter Change personal data.
Change language
You can change the displayed language for the user with the Change settingsbutton.
How to change the displayed language can be found in the chapter Change language.
Enabling/disabling page rights for the user
To enable a tab or action for the user, you must select the corresponding page right in the user’s detail view.
An explanation of page rights can be found here.
Assign a new password
You can assign a new password for the user with the New password button.
How to assign a new password can be found in the chapter Change Password.
3.4. Display user activity log
Sensitive card data
For security reasons, PCI DSS requires that every user access to sensitive credit card data must be traceable. Therefore, the application does not store every user action, but only security-relevant actions such as data accesses.
You can use the Administration → Activity log tab to search for security-relevant user actions within the application. You can set filters for the time period, the user and the user’s security-relevant action within the application. You can export the search results as an Excel file.
Using the search and filter area you can narrow down a period by desired date and time.
Selecting the “Transaction characteristics” selection area:
You can select two different operation characteristics: User and Security-related Action.
Select user: You can either select all users or a specific user.
Select action: Each security-relevant action of a user is saved. Explanations of the individual security-relevant actions can be found in the table below.
You can query all actions or search for a specific action. By clicking on the Search & Filter button, you then perform the query. The list shown can in turn be downloaded as a CSV file.
The log does not register every operation, but only safety-relevant functions and data accesses. The following table describes the operations that are stored in the log:
| Process | Description |
| cancel | Canceling a process |
| capture | Posting a process |
| credit | Crediting a process |
| delete | Removing information, for example from a list |
| download | Download batch or settlement files |
| Gdpr-delete | Personal data deleted |
| insert | Adding information, for example to a list |
| login | User login |
| logout | User logout |
| order | Attachment of a payment |
| payment | Making a payment from the terminal |
| query | Data query |
| reverse | Cancellation of a process |
| sale | Execution of a purchase (authorization and payment) |
| update | Modification of subscriptions or entries |
| upload | Upload batch files or blacklists |
| view | View specific pages and details |